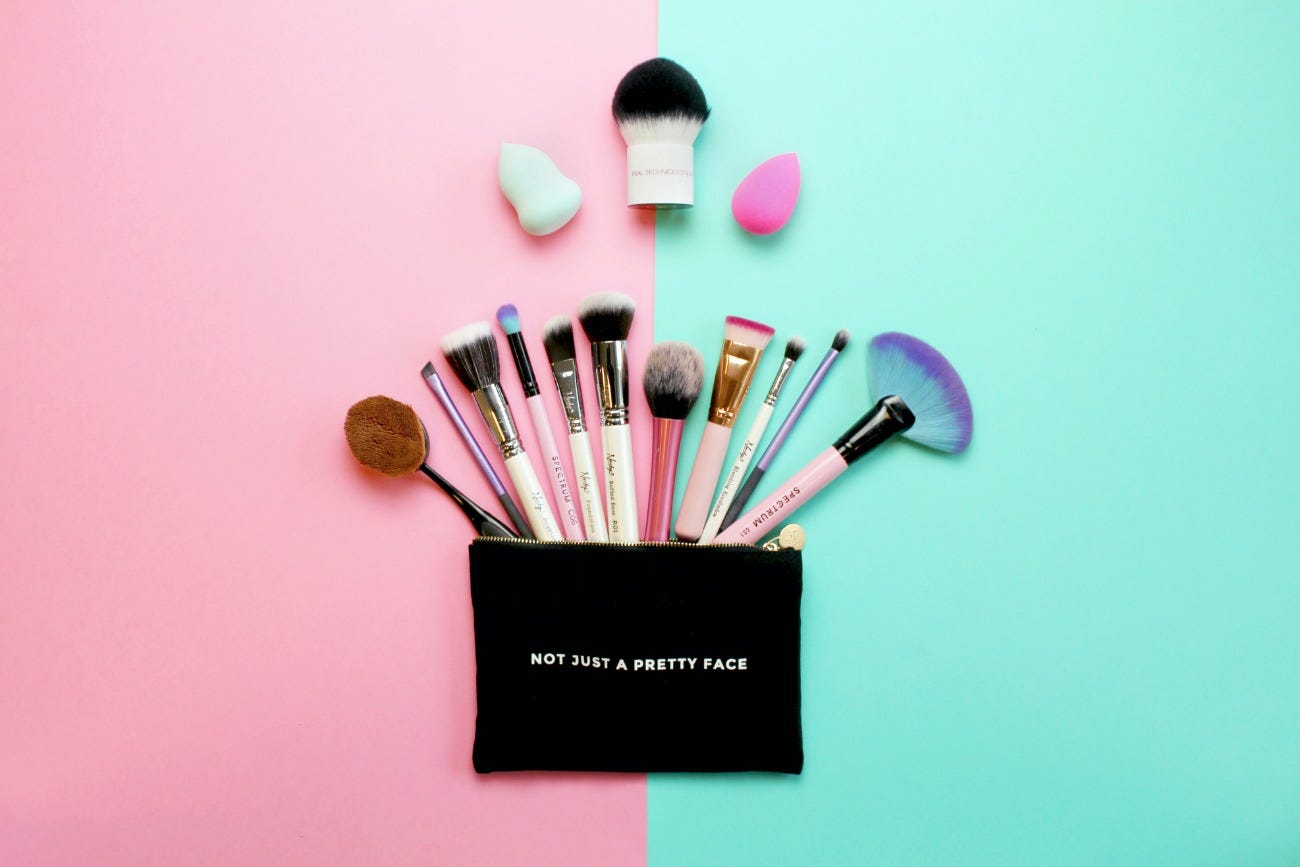
Makeup brushes are (or should be) a staple in any beauty routine; they’re the bread and butter of makeup application and can take you from a good 7 to a 10 in next to no time. We all love a makeup brush, but with so many varieties on the market (it’s all a bit overwhelming) you’re often left wondering where to start. There’s no doubt you’ll know what most brushes do, but putting them into practice can be an entirely different story, and knowing which ones are actually worth the investment can be mind-boggling.
If you’re a novice in makeup, or just can’t work out your powder brush from your blush brush, don’t panic – as always, we’ve got your back. Whether your aim is to perfect that flawless base, achieve killer cheekbones or that coveted Insta brow, check out our handy guide to makeup brushes and we’ll help you determine the type of brushes you need, and more importantly – how to use them.
THE STAPLES
Foundation Brush – Probably the most daunting of them all, but without a doubt, the most important. We’re sure you’ll agree with us when we say your foundation is the primary makeup step you most need to perfect; it’s your canvas and there’s little advantage in working that contour if you haven’t aced your base (alllll that she wants is another …makeup brush). Now, the million dollar question – should you go for the traditional flat tapered brush, the buffer brush, or the new guy on the block: the dense oval brush? (y’know, the one that looks like a lollipop and is taking the beauty world by storm)
The traditional foundation brush is flat with flexible bristles that are great for blending liquid or cream foundations. You should start in the middle of your face (where you need the most coverage) and blend in a downward motion. For flawless, heavier coverage, the Buffing Brush is ideal. The densely packed bristles will buff product – including liquid, cream and powder – into the skin for a more natural look, without the product appearing as if it’s just sitting on top. You also avoid brush marks – winner! FYI, we’re often found swooning over the Nanshy Buffed Base or Real Techniques Buffing or Expert Face Brush.
Now, the one to watch, which we can only describe as a lollipop-type thing: the dense Oval Brush. This brush, championed by the likes of Iconic London and quickly imitated by purse-friendly Primark, seems to be the tool of choice at the moment and is fast becoming a cult classic. This type of brush is great for getting the most out of a full coverage liquid foundation. We kinda like it; admittedly it feels rather strange, but its ability to buff is on point. Airbrushed? You betcha!
Kabuki Brush – Possibly the most underrated brush out there. This short-handled, densely packed brush with rounded bristles is ideal for absolutely everything; from powder/mineral foundations to bronzer and blush. Our personal fave way to use this is with bronzer to warm up the complexion and subtly sculpt the face.
Concealer Brush – If you’d rather use a different brush for your concealer instead of your foundation brush, we’d suggest using a small rounded brush or flat topped brush to pat concealer into the skin. This helps make blending more precise and allows you to get into the little nooks and crannies of your face (we’re talking inner eye corner, either side of your nose and over blemishes in particular btw).
Powder Brush – We like to call this the obligatory brush, simply because your makeup bag shouldn’t be without it. This brush can be used to apply any type of powder, however, it’s particularly great for pressed or loose powder to set the base you’ve worked so hard on.
Blush Brush – Blusher brushes tend to be either rounded or angled, and on the fluffier side – to pick up just the right amount of product. Swirl the bristles into powder blush and apply to the apples of the cheeks, guiding the product upwards towards your cheekbones. The blusher brush can also be used to apply bronzer if the kabuki brush isn’t working for ya.
All-over Eyeshadow Brush – Choose a brush slightly smaller than the width of your eyelid (and one that is relatively fluffy) to help blend colour across evenly. There are two techniques we’re rather fond of: the windscreen wiper sweep and the circular motions approach.
Blending Brush – If you find you’ve applied your eyeshadow a touch too harshly, or you’re using multiple shades, go in with a large and fluffy blending brush (you’ve probably heard of the cult 217 from MAC Cosmetics) to smooth lines for a more natural blend.
TAKING IT UP A NOTCH
Stippling Brush – This is a flat-topped brush that helps you build coverage gradually. This brush is suitable for the application of any type of liquid and cream product, while the stippling motion warms up the product to blend it flawlessly for an airbrushed finish.
Fan Brush – For the highlighter enthusiasts out there (we see you), the fan brush is a game-changer for the ‘highlight on fleek’ look. This is a great brush for experimenting with your highlight because the bristles lightly pick up product for a softer finish, which can also be built up for a more intense look if desired. Sweep the ends of the bristles across your cheekbones in an upwards motion and rock that glow! Learn more about highlighter in this post.
Contour Brush– Whether it offers a flat top or angled tip, the contour brush is great for carving out the hollows of your cheeks for killer contours. This is a good one for channelling the Kim K look. Don’t forget to suck your cheeks in like a fish!
Lip Brush – For those with slightly smaller lips, a lip brush can often be a lifesaver – especially when working with a bold colour. As an alternative to applying lipstick straight from the bullet, use the lip brush to remove pigment from the lipstick and apply to lips for ultra definition.
Angled Liner Brush – The one with flat, densely packed bristles that becomes an essential tool when achieving winged eyeliner. Use with eyeshadow or cream liner products for a precise flick that gets up close and personal with your lash line.
Brow Brush – Often similar to the angled liner brush, this small, firm and densely packed brush is the one for ‘on fleek’ brows. Having a spoolie on the end is an added bonus and you’ll soon find it’s a hard one to live without. Benefit Cosmetics, Anastasia Beverly Hills and Real Techniques have each got a brush to help you in this department.
Smudging Brush – This is the one for those of you wanting to master the smoky eye; its rounded tip will particularly help you when transitioning colours, but It’s also great for smudging eyeliner or shadow across the lower or top lash lines.
Angled Fluffy Eye Brush – This brush is ideal for when you want a more precise application of eyeshadow. It also works well when winging out your shadow and blending shades together.
THE SPONGE
OK, so forgive us. The beauty sponge is not technically a brush (let’s not get pedantic) but it’s a great tool to have among your stash of brushes. Sponges are a sure-fire way of achieving a flawless base, and actually, they work well for applying any cream or liquid product. We’re assuming you’ve all heard of the beautyblender, which is the holy grail of makeup sponges for many, however, we’re also partial to the Nanshy Marvel Blender, B. Beauty Sponge and Real Techniques Miracle Complexion Sponge (or the diamond one, that’s a good’un too). Beauty sponges are particularly amazing for when you have more time in the morning as they can take a little longer than a brush to work their magic.
TOP TIP
We like to keep our makeup brush game relatively strong with many useful duplicates (saves the weekly deep clean, duh!)
Nothing is better than a fresh set of makeup brushes, but you’re going to need new products to use them with, right? Check out our selection of makeup in our Build Your Own section.