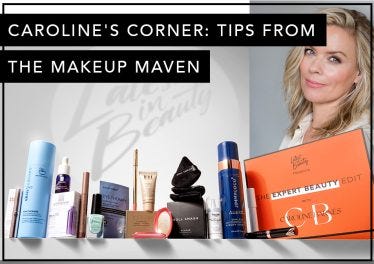
Posts Tagged ‘nail polish’

« Older Entries

Beauty news: OPI does their bit for charity

Monday, March 5th, 2012


Did you know that March is Ovarian Cancer Awareness Month? No, neither did we – but with 1 in 72 women suffering from the ‘silent killer’, it’s about time we knew more. To help raise funds and awareness, OPI is donating £1 from every purchase of the delightfully deep aqua blue polish, ‘Teal The Cows Come Home‘, to Ovacome, an Ovarian Cancer charity. And with teal being the recognised colour for ovarian cancer, you can show your support with pride.

Teal The Cows Come Home is available from lenawhite.co.uk for £11.

Share

Beauty news: Oscar inspired nail varnish

Friday, February 24th, 2012

Everyone and their dog seems to be going Oscar cray cray (us included – see our Red Carpet Collection Box information here) and none more so than American beauty brand Julep, who has created a range of Best Actress nominee inspired nail colours.

The leading lady shades include Glenn (Close), a berry red shimmer;  Viola (Davis), a deep purple; Elizabeth (Olsen), a midnight blue; and Rachel (Weisz), a gold copper tone plus one very special shade named after the Oscar award itself in gold glitter, of course. So even though the main honour can only go to one of these deserving ladies, having a nail varnish named after you isn’t such a bad consolation prize! Although not stocked in the UK, we think it’s a mega cool idea.

I may not be up for an Oscar (this year), but the ‘Carla’ polish would be a glossy, grey-pink putty tone – what would yours be?

http://www.beautyhigh.com/body/nail-care/19188/julep-releases-oscar-inspired-polishes

Share

Beauty news: OPI’s new collection, ideal for prima ballerinas everywhere…

Thursday, February 16th, 2012

OPI New York

Ever since Black Swan pirouetted into cinemas, we’ve been obsessed with the fine art of ballet. And we can keep on obsessing with the new additions to OPI’s soft shades range, five new neutral colours and one sparkler inspired by the elegant and whimsical world of the New York City Ballet. Launching April, you’ll be en pointe with Barre My Soul beige, Pirouette My Whistle silver and Care To Danse? lilac. Now, where did I put my tutu?


Share

Beauty news: MUA Love Hearts

Tuesday, February 14th, 2012

MUA Love HeartsMUA has teamed up with the most romantic of sweets, Love Hearts, to launch a range of loving lip balms and nail polishes. Show you mean boss with ‘Kiss Me’, advertise your ‘Great Lips’ or ask for a ‘Sweet Kiss’ without uttering a word with the cutesy lip balms or choose from one of the six pastel shades of nail varnish including canary yellow, lilac and sherbet pink. From £2, the range can be purchased from the MUA store.

Share

Beauty news: Nails Inc launch new shades for Spring

Friday, February 10th, 2012

Nails Inc Neons Nudes Neon or nude, neon or nude, neon or nude…Nails Inc have thrown up the quandry we’re all in for Spring/Summer with their new Neon & Nude collection – will you be keeping it girly and sweet in nudes or bright and bold in neons? Those in the know will be going for both with the reverse French manicure, a bright spin on the traditional nail effect, and this new collection of best-selling nudes and new neons will do the trick.

And that’s not all – inspired by the S/S 12 shows of Richard Nicol, Acquascutum and Osman, Nails Inc have designed two new shades for spring. Baker Street (as worn by Beyonce recently) is a rich, cobalt blue whilst Notting Hill Carnival shows a softer side with pale yellow. Both the new shades and collection will be available from March.


Share

COMPETITION: My True Love Gave To Me…12 Spangly Sparklers

Friday, December 16th, 2011

On the 12th Day of Christmas, my true love gave to me…12 Spangly Sparklers (OPI Nail Polish)

OPI

The drummers may not be drumming but your nails will be sparkling with OPI‘s range of glittering nail polishes. We have 12 bottles to give away, including the ruby red ‘Getting Miss Piggy With It‘, the heart warming ‘Be Mine, You’re Fine‘ and ‘Servin Up Sparkle‘, which does exactly what it says on the tin. Worth £9.95 each, 12 of you lucky winners will be shining all the way to Christmas!

Plus, enter every day in the 12 Days of Christmas competition and you’ll be automatically entered into a bonus 13th day to win a hamper of beauty goods worth £500!

To be in with a chance of winning one OPI nail polish, you can enter our giveaway in various ways:

- Enter right here on the blog, by leaving a comment below
- Enter on Twitter, by retweeting our giveaway tweet
- For an extra chance, don’t forget to like us on Facebook and like the competition post

This competition is open to UK residents only. For detailed competition information and general rules regarding our daily giveaways please click here. Please note that we cannot guarantee that prizes will arrive before Christmas. We are giving away 12 x 1 bottle of OPI polish worth £9.95 each; you must enter each day’s competition seperately, no entries can be rolled over.

This competition ends at 9am 19th December.

Share

Nail art how to – Christmas Holly

Monday, December 12th, 2011

Don your mad crazy Christmas jumper and wrap yourself in tinsel because we’re going all out Christmas with the final of our nail art how-to guides. For the finale, Sam Biddle has chosen a suitably festive design – Christmas holly.

Christmas holly

To get started, you need a red nail varnish, green nail varnish, white acrylic paint and a Sugar Styler brush.

Holly step 21. Apply two coats of your base colour (works best with red glitter or for a more pared down look, try a burgundy red). Once dry, use your Sugar Styler brush to apply two thin white lines on your chosen feature nail. So that they angle away from each other, this will be your guide to the holly.

Holly step 3

2. Now to paint the holly – paint a thin line, starting at the bottom end of your centre line to create an arc, which is the edge of your leaf. Dip your brush in the paint again before starting the second line. Once you’re happy with the shape, fill it in with the white to act as a base for your green – it’ll help make the colour pop. If you make a mistake, don’t worry – the paint is water based and can be washed off.

Holly step 4

3. Once your happy with the shape of your leaf, use a bright green to paint over the white. Create a centre vein to give the leaf extra definition with a slightly darker green polish. Don’t worry if you don’t have one, simply your green paint with blue or black to darken it.

Holly 6

4. For an extra bit of pazazz, add a few gems – it is Christmas, after all. To make them stick, apply a top coat over your nails and whilst still wet, apply the gems.

Share

COMPETITION: My true love gave to me…6 polishes a sparklin’

Thursday, December 8th, 2011

On the sixth day of Christmas, my true love gave to me…6 polishes a sparklin’ (W7 nail varnish sets)

w7

Metallic, glitter and sparkly, on the 6th day of Christmas, show your nails some love with today’s prize of 6 W7 nail polish sets, containing three sparkling colours. From the traditional gold and silver to regal purple or jade green, we have a variety of colours and shades to give away.

Plus, enter everyday of the 12 Days of Christmas competition and you’ll be automatically entered into a bonus 13th day to win a hamper of beauty goods worth £500!

To be in with a chance of winning one of six W7 nail varnish trios, you can enter our giveaway in various ways:

- Enter right here on the blog, by leaving a comment
- Enter on Twitter, by retweeting our giveaway tweet
- For an extra chance, don’t forget to like us on Facebook and like the competition post

This competition is open to UK residents only. For detailed competition information and general rules regarding our daily giveaways please click here. Please note that we cannot guarantee that prizes will arrive before Christmas. We are giving away 6 x 1 W7 nail varnish trios: colours may vary; please note that you have to enter each day’s giveaway seperately.

This competition ends at 9am 11th December. Check back tomorrow for the 7th day! Here’s a clue…7 Storms a Brewin’

Share

Coco Nail Bar, I think I love you

Tuesday, December 6th, 2011

Coco's Nail Bar

Manicures – you gotta love them. Whilst I do, I sometimes find the whole process a little…boring. (There, I said it). Which is why I’ve decided I want to move in to Coco Nail Bar, a contemporary spa in the heart of Portobello Road where champagne’s on tap, cocktails are being shaken AND stirred and you can catch up with the latest Gossip Girl on your own entertainment tablet. Sounds like heaven doesn’t it? And that’s before we’ve considered getting a manicure or pedicure from Coco Nail Bar‘s highly skilled nail technicians.

Coco Nail Bar Interior

I absolutely love the idea of online shopping whilst having a pedi or sipping on a specially blended cocktail whilst my nails are buffed and polished – all whilst sitting in a massage chair with the setting on ‘anti-cellulite’  (yes, really!) You can even hold pamper parties here for special ocassions, complete with barmen and goodie bags. It’ll beat your 8th birthday party in best birthday stakes, that’s for sure!

This is a nail bar, 2012 style…

Coco Nail Bar is located on Portobello Road, Notting Hill; for more information, treatments or to book an appointment, visit Coco Nail Bar.

Share

Nail art how to – Ribbons and Bows

Friday, December 2nd, 2011

Wrap up nail art in one fell swoop with this week’s tutorial from Sam Biddle – a cutesy ribbon and bow design.

Bows and Ribbons

Sam comments: “I like to give this look a  bit of edge with vampy black but not everyone can wear black, so try dark purples or blues. Don’t forget, this design rocks on your toenails too!”

Step 2 Bow

Step 1: Apply two coats of black nail varnish and allow to dry. Using your Sugar Styler (or detail brush size 000), apply a triangle on your middle finger, so that the point of the triangle is towards the middle of the nail.

Bows Step 3

Step 2: Apply a second triangle the opposite way so the two points meet.

Bow Step 4

Step 3: On the nails either side of the bow, apply another triangle and give them a slight curve.

Bow Step 4

Step 4: At the ends of each of these curved triangles, attach a circle – one hanging and the other perched on the thinnest tips.

Step 6 Bow

Step 5: Paint the very ends of your ribbon – by now the shape of the design should be developing and you’ll see the best place to put your ribbons.

Bow step 8

Step 6: Now for the fun bit! Take your black paint and add detail to the silver polish; place another circle inside the silver circles giving your ribbon loops. Also paint two tear drops towards the top of your silver triangles to create loops in the main part of the bow. Next, dip a cocktail stick into the black paint and add dots to your ribbons and bows.

Related Posts Plugin for WordPress, Blogger...
Share